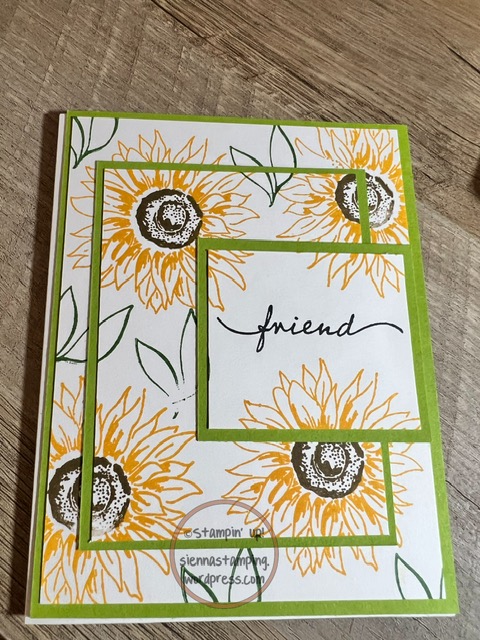
Hi friends! I want to show you a technique that is easy to do, but really adds that pop to your cards. It’s called the Triple Layer Technique, also known as the Triple Time Technique, due to the 3 layers of cardstock that you stamp on. Let me show you how to do it!
To start, you will need 3 pieces of white cardstock in these sizes: 4 x 5 1/4″, 3 x 4″, and 2 x 2 1/4″. You will layer these on top of each other and stamp over all the pieces at once.
First, take your smallest piece (2 x 2 1/4) and stamp your greeting. I used Memento Tuxedo Black, but you could use any color.
Align your white pieces as pictured: the biggest piece should be on the bottom, the middle-sized piece more to the left, and the small, stamped piece to the right. To hold them secure while stamping, place a glue dot on the back of the two smaller pieces, but before you stick them together, touch your finger to the glue dot several times. This will help the glue dot to lose some of its stickiness, and you will easily be able to remove the pieces from each other when you are done stamping.

You can use any stamp set you’d like- I like the look of a bigger stamp with a smaller coordinating stamp, but I certainly don’t think you’re limited to that. Choose 2 coordinating stamps and 2 coordinating ink pads. Stamp your first stamp in three to five areas on your white cardstock, making sure to stamp over your layers and leave some white space. It’s ok if you go off the edge of your paper- just make sure to have a scrap paper underneath so it doesn’t transfer to your table top.
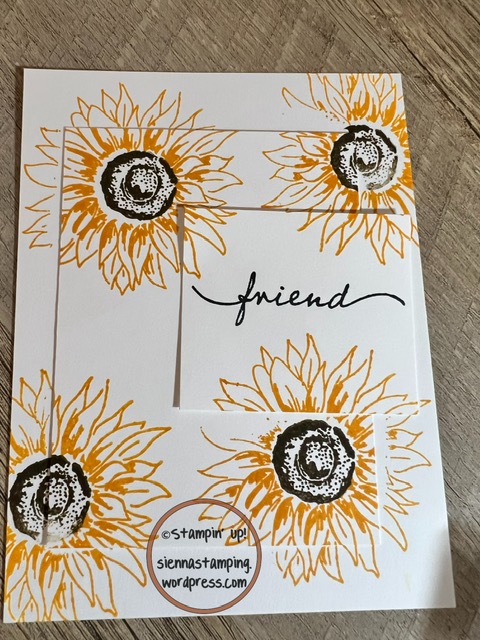
Using your second stamp and different ink color, fill in the white spaces. Don’t be afraid to rotate your stamp- it doesn’t have to be perfectly aligned.
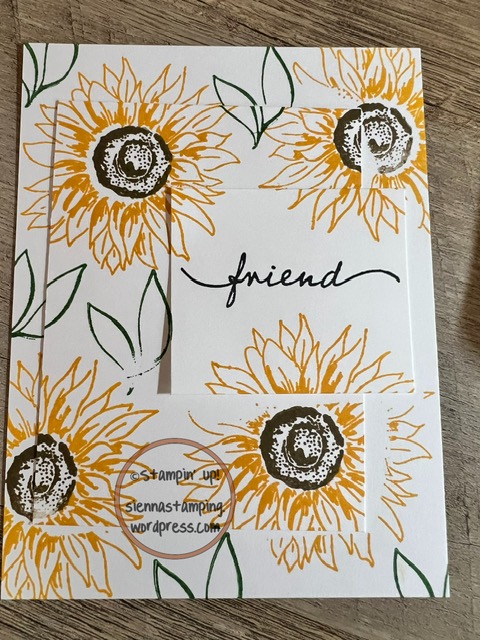
Separate your pieces gently by twisting gently- they should easily pop apart.
You will need 3 pieces of coordinating cardstock, measuring 4 1/4 x 5 1/2″, 3 1/4 x 4 1/4″, and 2 1/4 x 2 1/2″. Center your white cardstock onto the pieces and glue together.
When arranging the pieces onto your card base, be sure to line up the pattern so the image looks as if it’s flowing from one section to the next.
Any questions? Let me know! I’d love to see what you create!
Happy Stamping!
Jen


Leave a comment