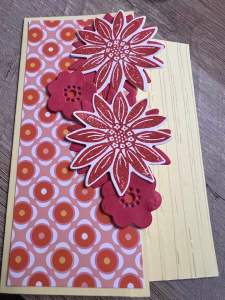
I was experimenting with dies, to see how I could attach them to a card, and I came up with this card design. It’s super simple, and a great way to use up excess die cuts you have on your desk. I kept this card themed to one dominant color, but it would totally look great if you used different color combinations. I’ve recently discovered patterned papers from Catherine Pooler, and I have to say I am loving the fun, bright colors that are printed on heavier cardstock (80 lb). It’s worth checking out if you need some fresh options.
Supplies Needed:
- 8.5 x 11 sheet of colored cardstock (should match your patterned paper)
- 2 x 5.25 piece of white cardstock for inside of the card
- Additional white cardstock for making die cuts
- 6 x 6 piece of patterned paper
- stamps, inkpad, trimmer tool with scoring blade, adhesive, dimensionals
- optional: die cutting machine, embossing folders, dies (see notes)
Instructions:
- You’ll want to start with an A2 card base, which measures 5.5 x 8.5, scored at 4.25.
- Cut off 1.75 from the front of your card base. Set aside.
- Cut your patterned paper into two pieces that measure 2.25 across by 5.25 down. Attach one piece to your card front
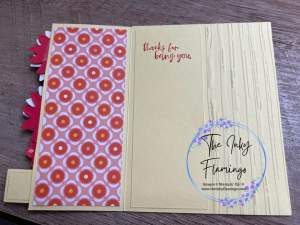
- Open your card, and attach the second piece of patterned paper to the back (left side)
- Emboss the right side of your card, approximately 2″ from the right.

6. Cut a piece of colored cardstock that measures 4.25 x 5.5. Adhere this to the back of your card to provide extra stability to your card base.
7. Make and assemble your die cuts. For my main flowers, I used a die cut out of colored cardstock, a stamped image, and attached them using dimensionals. The smaller flower was cut out of colored cardstock, and all were attached to the front of the card.

8. Take your 2 x 5.25 piece of white card stock, stamp your sentiment on it, and attach it to the left of your embossed section.
Notes:
- If you don’t have an embossing machine and dies, you can purchase pre-cut images or ephemera to use instead. You can also create your own by stamping on white cardstock, coloring in with alcohol markers, and fussy cutting the images out with scissors.
- To emboss without the machine or embossing folders, you can use a stylus and ruler to achieve the lines effect. You can also use stickers, washi tape, rub-on transfers or just leave blank. It’s up to you!
🪴🪴🪴🪴🪴🪴🪴🪴🪴🪴🪴🪴🪴🪴🪴🪴🪴🪴🪴🪴🪴🪴🪴🪴🪴🪴🪴🪴🪴🪴🪴🪴
Share what you create! Thanks for following along!
Jen


Leave a comment