Hello friends! I wanted to share with you today a card I’ve made using paper scraps. You know those little strips of decorative paper you end up that are too small to keep, yet you hate to just throw them away? I took a punch I don’t use anymore, and those little scraps and came up with an idea that I call a scrap circle. I hope it may be useful for you!
I started by using a 3″ circle die and cut out a circle. This was my base piece that I used to attach the little punch-outs. I used the Best Label punch, which was coordinated with the Alphabest stamp set (retired).

The punched pieces measure 3/4″ x 1/2″, so you can see that you can use up even your smallest scraps. If you don’t have this particular punch, it’s fine! Just grab a smaller punch you have and use that. I considered using dies, but in the end it seemed too time intensive.
So, every time I had a small piece of paper, I would grab my punch and use up that piece. I then adhered the punched pieces to the 3″ circle right away so they wouldn’t get lost. Here’s a pic of what it looked like after several pieces were attached:

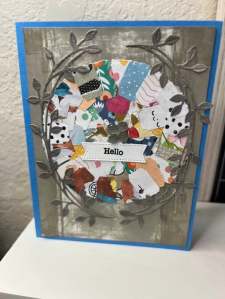
You can see that I left the circle open in the middle because I was originally thinking that it might look like a flower. The next picture shows it completed. Instead of using the flower idea, I decided to cut it with a 3.5″ circle die to even out the edges
I knew I wanted to use Azure Afternoon card stock for the card base, as I thought it worked well with the multiple colors of the scrap circle . Typically I use DSP (decorative paper) on top of the card base, but I knew that would be too much of a contrast, so I took a piece of basic white cardstock, cut to 4″ x 5 1/4″ and swiped my basic gray inkpad over for this result:

Note: You will need to let the ink fully dry before you attach it to your card.
I attached the scrap circle to the card front with regular adhesive; I felt it has enough dimension with the layered paper scraps, and didn’t need that extra bit of height that dimensionals would give it. I may try it next time, though, to see the difference it may make.

I added the sentiment across the circle, but you may also place it either above or below the circle. Another fun effect is to emboss the scrap circle before you adhere it to the card. I questioned if I wanted to add more to this card, so I did die cut some leaves to encircle it. Which one do you like better: with or without leaves?
I do feel this technique is versatile, in that you can choose the color theme to coordinate with the card type you want to make. In a mood for Christmas cards? Choose only red or green pieces to attach to your scrap circle. Halloween cards could be orange and black. The possibilities are endless.
Drop me a comment with your thoughts! Is this something you would try?
Happy Creating!
Jen


Leave a comment